Introduction
Not everyone wants to, or needs to shoot RAW and post-process their images.
The key difference between shooting RAW and JPEG is that JPEG’s are processed by your camera based on user settings and photo or picture styles, which are pre-sets for different shooting situations.
The Panasonic Lumix Digital Camera Know How site has a diagram that shows the key difference between shooting RAW and JPEG, and how digital cameras process JPEGs, see below.
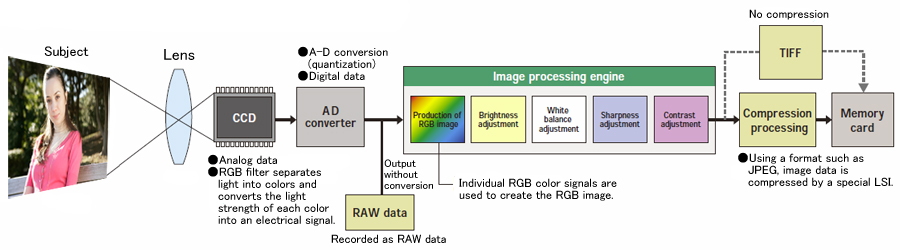
Camera manufactures spend a lot of time calibrating and testing their cameras to give us out of the camera (OOC) JPEGs that look good.
Good image quality depend on 3 things,
- Quality of the lens being used
- Image sensor
- Camera processing engine
And the skill of the photographer in shooting and exploiting the technology built into their cameras.
The essentials of shooting JPEG
- Set your photo style
- Set your white balance
- Apply highlight or shadow adjustments
- Optimise your exposure
Photo Styles or Picture Styles
Photo styles (PS) adjust the look of your image by setting the amount of contrast, sharpness, noise reduction and saturation being applied to your photos. You might have the following photo styles
- Standard
- Landscape
- Portrait
- Natural
- Black & White
- Custom styles
Each style will change how your final JPEG looks when processed.
Tip 1
Set the correct photo style for the type of photography you are doing.
White Balance
White balance and exposure are two key elements of shooting JPEG because, if you get these settings wrong, they cannot be corrected. It is one reason why some photographers like to shoot RAW as these two elements can be adjusted when post processing a RAW file.
I normally leave my white balance on Auto and trust my camera to get it right. If I have difficult mixed lighting then I might do a manual white balance.
Tip 2
Set your white balance to Auto WB.
Control the Highlight and Shadows
Many digital cameras have a function to help control the highlights and shadows in your image. Normally there are two ways of doing this, One is by use of highlight / shadow curves control. and the other is by using a function that automatically compensates for dark shadows and bright highlights. Each camera manufacturer may have a different name for these.
- Panasonic, i-Dynamic
- Nikon, D-Lighting
- Canon, Auto Lighting Optimizer
- Sony, D-Range Optimizer
These work by just applying exposure compensation the highlight and shadow areas in your image.
Exposure
Setting the optimum exposure for your subject or scene is important whether you shoot Raw or JPEG. It is even more important when shooting JPEG as you cannot alter the exposure when post editing your JPEG images.
There are two camera functions that can help you ensure that your images are exposed correctly, one is the histogram and the other is zebra patterns.
Histogram
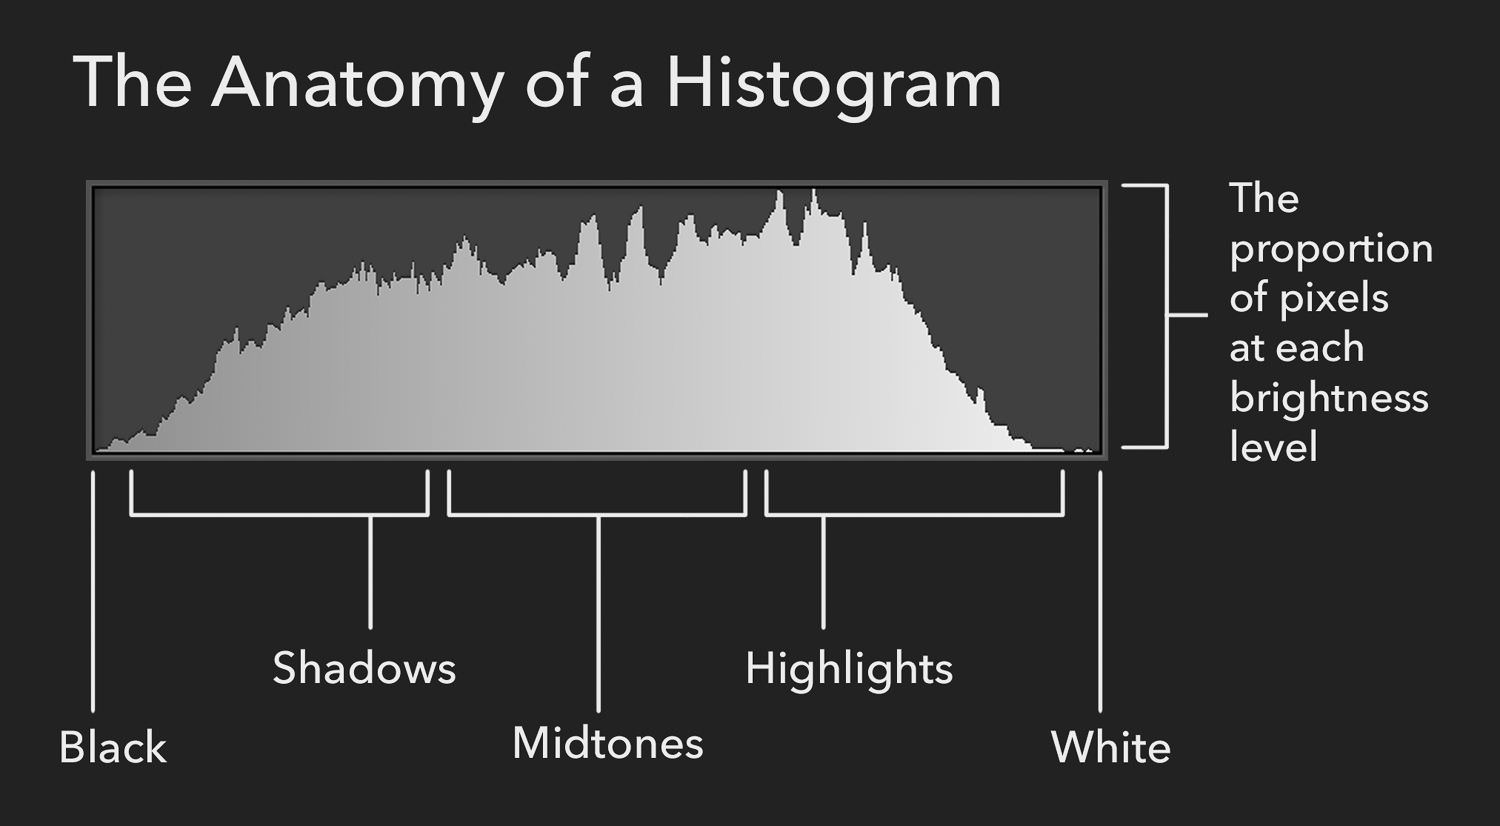
Histograms show you the distribution brightness of a scene, you can read more about them on this excellent website PhotographyLife. Using your cameras histogram helps you to ensure that your subject is exposed correctly.
Zebra Patterns
Zebra patterns can help show where the brightest parts of your image are and if you set them correctly, they help you avoid over exposed highlights. Not all cameras have them.
Here is a short video from Panasonic that shows you how to use zebra patterns on Lumix cameras, it will be similar for other camera models too.
Tip 3
Make use of your cameras histogram and zebra pattern function to help optimise your exposure and avoid blown out highlights.
Dynamic Range
when shooting in JPEG mode, many new cameras now come with a dynamic range function, you can switch this on to help improve both shadow and highlight detail.
For Lumix cameras it is called iDynamic, Nikon call it D-Lighting and both Canon and Sony have their own version of it too.
Tip 4
If your camera has a dynamic range function, enable it. This will help keep the highlights and shadows balanced.
Here are the 4 tips summarised for you.
- Set the correct photo style for the type of photography you are doing.
- Set your white balance to Auto WB.
- Make use of your cameras histogram and zebra pattern function to help optimise your exposure and avoid blown out highlights.
- If your camera has a dynamic range function, enable it. This will help keep the highlights and shadows balanced.
Following these 4 simple steps will help you get better results from your camera by exploiting the functionality built into your camera.
My final tip would be that, if you generally shoot in good lighting conditions then you may want to set your ISO to auto as this will help avoid any underexposed images by automatically adjusting the ISO as you move from bright to dull lighting conditions, for example shooting outdoors and then going indoors.
Start the discussion