‘Before digital photography, professional photographers needed to ensure that their slide films or negatives were correctly exposed and processed. There was less latitude for errors’ and the old saying was, you can’t get out of a negative what is not there’
There are plenty of sites out their that explain the use of the exposure triangle and the relationships between aperture, shutter speed, ISO and the use of your cameras white balance function. However, not many talk about being able to ‘pin your exposure‘, what do I mean by that? It’s the ability to look at the scene or subject in front of you and determine the appropriate camera settings so that your resulting exposure whether output as a JPEG or RAW file, renders all of the important subject matter of the scene appropriately.
There are a number of tools to help you
- Your cameras histogram
- Your cameras build in exposure meter
- Your own eyes and photographic knowledge
- Your cameras scene modes
- Your cameras metering mode
- A handheld exposure meter
- Understanding the dynamic range of your camera
The saying, ‘you can’t get out of a negative what is not there‘ is also true of digital photography. It is important to understand the dynamic range of your camera. In terms of photography, we are talking about the number of stops difference between the lightest and darkest part of your scene and your cameras ability to handle the contrast within in the scene.

Looking at the image above, we can see that we have some ‘burnt out highlights’ (setting sun) and some ‘blocked shadow details’ (rocks). The ‘contrast range‘ of the scene exceeds the ‘dynamic range’ of the camera. I was using (Samsung galaxy s6 mobile phone). An important point here is that; whilst a cameras histogram can alert us to blocked shadows and highlights, it cannot tell us which parts of the scene will be under or over exposed. As photographers we would need to
- use our own personal experience to interpret the histogram and scene before us.
- meter our scene intelligently.
The things to help you do this are
- Your own eyes and your experience in being able to judge a scene
- An exposure meter set to spot metering mode (inbuilt into your camera or handheld)
- The histogram of your camera
- And if you have it, live view on your camera
Using a spot meter allows us to measure the contrast range of the scene and decide for ourselves the best exposure setting.

Personally, I use the Sekonic L-758D handheld light meter. In the scene below, I was able to take three readings from what I judged to be the most important parts of my scene in terms of highlights, shadows and midtones. And using the Sekonic L-758’s multiple spot metering and averaging function, I was able to pin my exposure.
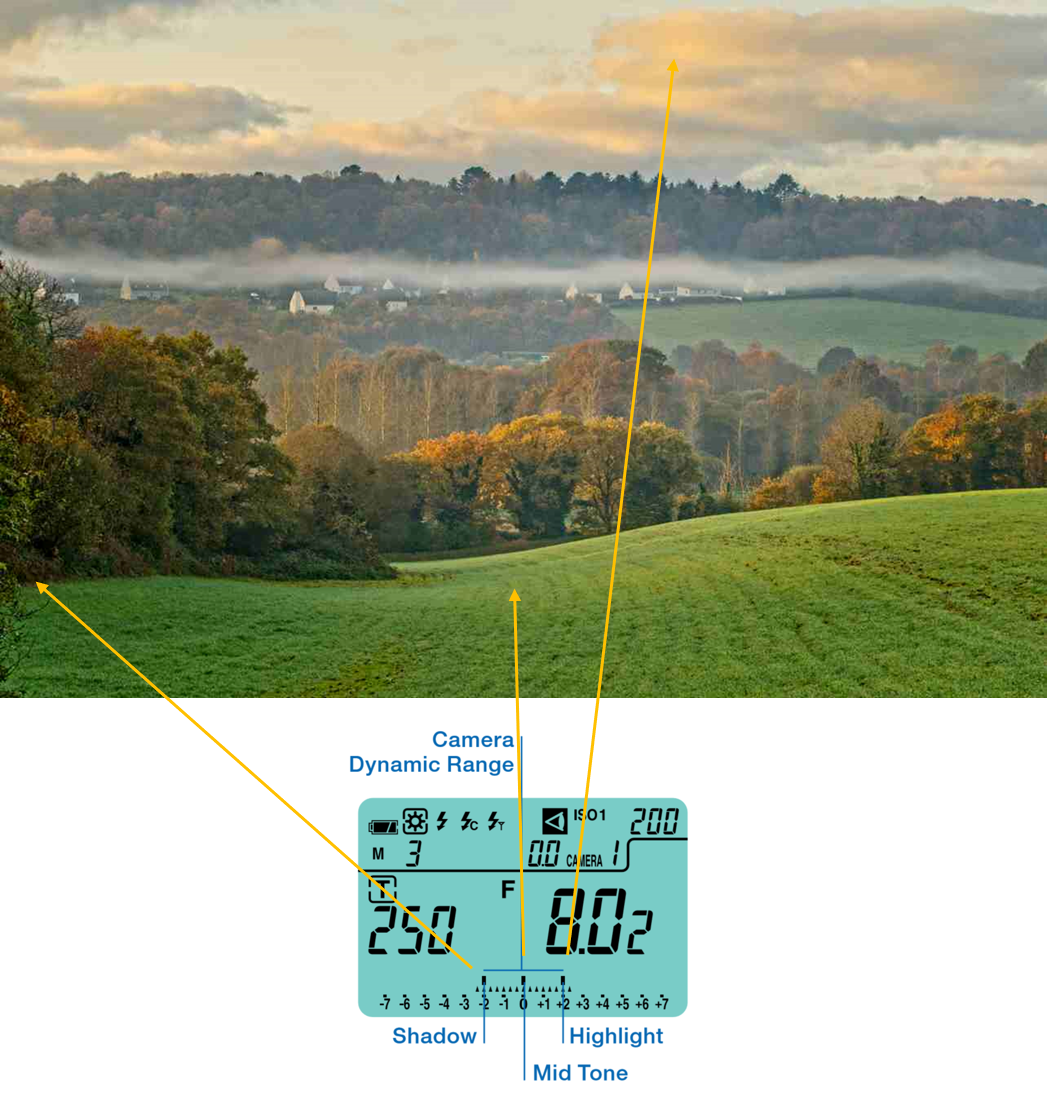
I can also see from the display that I have a five stop contrast range, which easily fits within the dynamic range of my camera.
If the highlight and shadow reading had been +3 (highlight) -3(shadow) I know I would have been at the limit of the contrast range of my camera.
I also know that in any post processing I do that I have enough data to push and pull my highlights and shadows. More than a 7 stop contrast range and I would have to
- change viewpoint to exclude burnt out highlights
- change viewpoint to exclude blocked shadows
- Return another time or day when the lighting conditions were more favourable
- Use HDR photography
- Except that I am going to have blocked shadows, or burnt out highlights, or maybe both
- Don’t take the picture
Despite the sophistication of digital cameras and their complex metering systems, my personal preference is to always use a handheld light meter. Why? Because experience has taught me that using a handheld light meter in either incident or spot-metering mode provides me with the best tool for interpreting the scene in front of me and setting exposure.
Links
Happy New Year to all 🙂
Start the discussion